spring boot その8 - spring security で 認可を行う
実装したソースは https://github.com/huruyosiathatena/springboot/tree/8ffe6e7ab202945b9399b1d34eb4462de223dcb1 にあります。
前回( http://huruyosi.hatenablog.com/entry/2015/08/08/003303 ) は認証を行ったので、今回は認可です。
認可の方法
コントローラーに@Securedアノテーションを指定して、必要な権限名を指定します。
コントローラーのクラスとメソッドのどちらでも指定可能です。メソッドに指定する場合にはWebSecurityConfigurerAdapterクラスの具象クラスに@EnableGlobalMethodSecurity(prePostEnabled = true, securedEnabled=true)の指定が必要です。前回のソースに含まれています。
@Configuration
@EnableWebMvcSecurity
@EnableGlobalMethodSecurity(prePostEnabled = true, securedEnabled=true)
public class WebSecuirty extends WebSecurityConfigurerAdapter  {

    @Autowired
    private DataSource dataSource;

~省略~
コントローラーの記載
下の記載では、このように振舞います・
- /sbadmin2/index.html はログインしていればアクセス可能
- /sbadmin2/forms.html はログインして ROLE_STAFFの権限を割り当てられていればアクセス可能
- /sbadmin2/tables.html はログインして ROLE_ADMINの権限を割り当てられていればアクセス可能
@Controller
@RequestMapping("/sbadmin2/")
@Secured("IS_AUTHENTICATED_FULLY")
public class SbAdmin2Controller {

    @RequestMapping("/index.html")
    public ModelAndView index() {
        return new ModelAndView("SbAdmin2Controller/index");
    }

    @Secured("ROLE_STAFF")
    @RequestMapping("/forms.html")
    public ModelAndView forms() {
        return new ModelAndView("SbAdmin2Controller/forms");
    }

    @Secured({"ROLE_ADMIN"})
    @RequestMapping("/tables.html")
    public ModelAndView tables() {
        return new ModelAndView("SbAdmin2Controller/tables" );
    }
テンプレートの表示制御
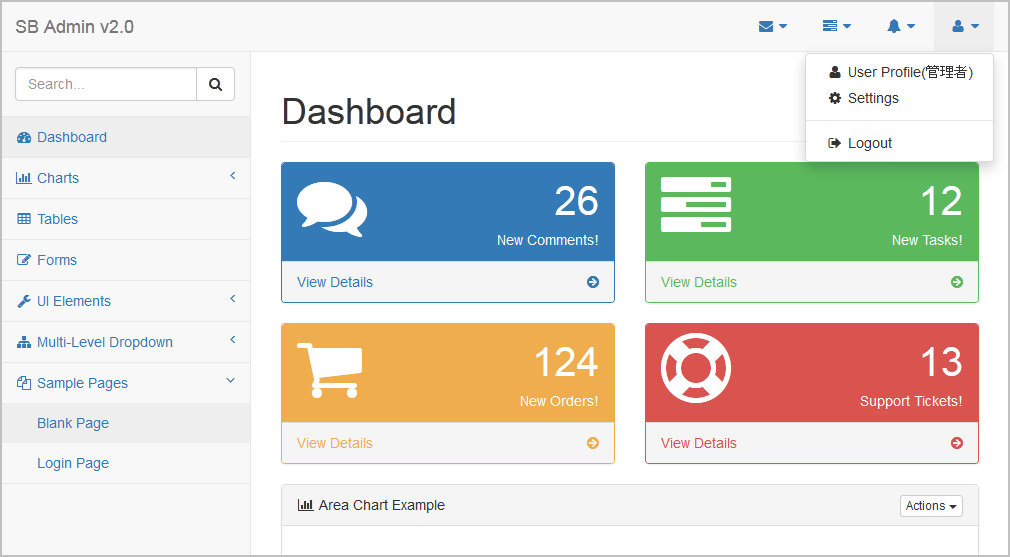
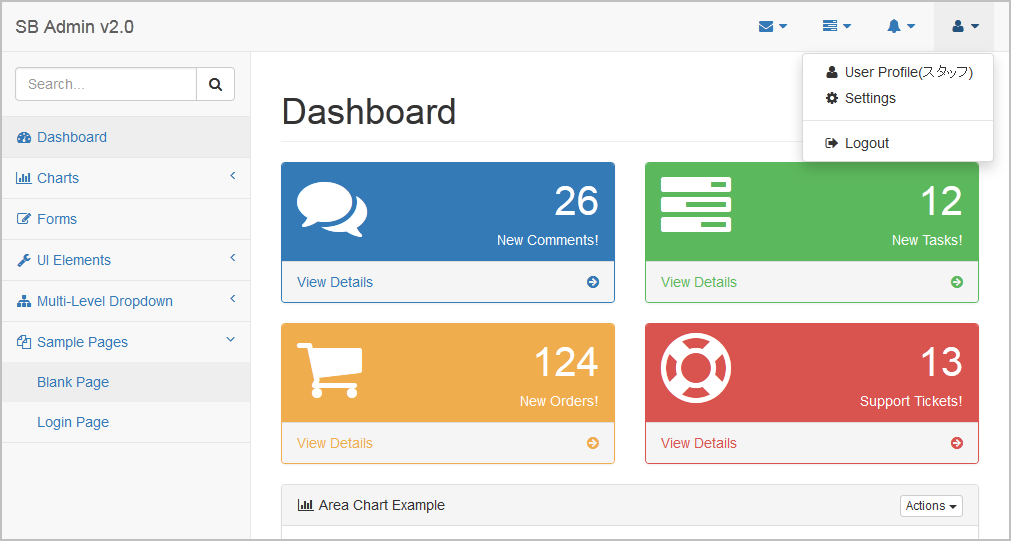
上のコントローラーの例では /sbadmin2/forms.html と /sbadmin2/tables.html は権限が割り当てられている場合にだけアクセスできます。画面の左側のメニューも権限が割り当て割れている場合にだけ表示するようにします。
                        <li sec:authorize="hasRole('ROLE_ADMIN')">
                            <a href="tables.html"><i class="fa fa-table fa-fw"></i> Tables</a>
                        </li>
                        <li sec:authorize="hasRole('ROLE_STAFF')">
                            <a href="forms.html"><i class="fa fa-edit fa-fw"></i> Forms</a>
                        </li>
sec:authorizeで必要な権限名を指定します。sec:authorizeを使うために xml名前空間を追加します。
<html lang="en"
xmlns:th="http://www.thymeleaf.org"
xmlns:layout="http://www.ultraq.net.nz/web/thymeleaf/layout"
xmlns:sec="http://www.thymeleaf.org/thymeleaf-extras-springsecurity4">
spring securityが割り当てられている権限名を取得する方法
ログインしたユーザ情報はorg.springframework.security.core.userdetails.UserDetailsから得ます。
getAuthorities()メソッドの戻り値に許可されている権限の一覧を入れておきます。
今回はユーザ情報を提供するcom.hatenablog.huruyosi.springboot.service.MyUserDetail#create(Users entity)で DBの authorities テーブルに登録されている 権限名を得られる様にしています。
public class MyUserDetail implements UserDetails {
    private int userId;
    private String username;
    private String password;
    private String displayName;
    private Collection<GrantedAuthority> authorities;


    public MyUserDetail(int userId, String username, String password,
            String displayName, Collection<GrantedAuthority> authorities) {
        super();
        this.userId = userId;
        this.username = username;
        this.password = password;
        this.displayName = displayName;
        this.authorities = authorities;
    }

    /**
    * {@link Users}を元にインスタンスを生成します。
    * @param user 生成元になるユーザ
    * @return
    */
    public static UserDetails create(Users entity) {
        List<GrantedAuthority> authorities = new ArrayList<GrantedAuthority>();
        for(Authorities auth: entity.getAuthorities()){
            authorities.add(new SimpleGrantedAuthority(auth.getId().getAuthority()));
        }
        return new MyUserDetail(entity.getUserId(), entity.getLoginId(), entity.getPassword(), entity.getDisplayName(), authorities);
    }

    /* (非 Javadoc)
    * @see org.springframework.security.core.userdetails.UserDetails#getAuthorities()
    */
    @Override
    public Collection<? extends GrantedAuthority> getAuthorities() {
        return this.authorities;
    }
    ~以下省略~
実際の画面
画面左側のメニューが変化しているのがわかると思います。
管理者の場合

スタッフの場合

ゲストの場合

課題
spring securityでは権限を階層化して管理することができます。spring security hierarchyで検索するといくつかサイトがでてきます。
クラスレベルではうまくいくのですが、メソッドレベルでは階層化した権限が効きませんでした。デバッグしてみると 権限チェックが2回行われていることがわかりました。
同じ状態で解決されたブログがありした。
Filterレベル(主として認証)の実装は指定した物を参照しているが、 Methodレベル(主として認可)の実装がデフォルト値が利用されているということでしょうか。
SpringSecurityのMethodSecurityとFilterSecurityではまるprepro.wordpress.com
GlobalMethodSecurityConfig で設定していることまでわかったのですが、カスタマイズがうまくいきません。xml を極力書かずに実装したかったので、今回は挫折しました。